How to Install an SSL Certificate on Google App Engine
No ratings yet.
October 31, 2019 at 9:31 AM
Categories: Development, Website/Seo | View Comments
One of my favorite blog posts of all time was "The Undocumented Guide to Using SSL on Google App Engine" which was on a blog called Neutron Drive Blog. Every time I needed to set up an SSL certificate on one of my App Engine hosted websites, I'd stroll on over to the post and enjoy some human sentences walking me through generating and installing my cert. Sadly, I went to renew a certificate sometime back in 2017, and my safety-blanket blog post was a big fat 404! So in homage to Neutron Drive Blog, here is my walk-through of using SSL on Google App Engine.
(There are also instructions from Google that are quite helpful, but lacking in the "safety-blanket human sentences" department.)
Update October 31, 2019: Managed SSL for Google App Engine
Since the time of writing this post, Google has come out with Managed SSL for Google App Engine. If you don't have a need for a specific SSL certificate (for example, an EV SSL certificate), then using managed SSL for GAE may save you a lot of work. Essentially, Google takes care of getting the SSL certificate and renewing it as needed for you. I use it for any project that doesn't need an EV SSL cert.
-
Click Custom Domains.
-
For the domain you want to secure, select the domain, and click the
Enable managed securitybutton. -
(Optional) Feel the joy of not doing all of the steps below. Optional, but highly recommended.
(On the Google blog post, there are also gcloud CLI instructions.)
However, should you still need to install your own acquired SSL certificate for your domain (as I still do for some websites), read on for instructions!
Instructions for Installing SSL on Google App Engine
Step 1: Purchase your SSL certificate from a reputable vendor of your choice.
Step 2: Generate your certificate signing request, or CSR. This is done from any computer with OpenSSL. The OpenSSL command you run is:
openssl req -nodes -newkey rsa:2048 -keyout myserver.key -out server.csr
On a Mac, you open Terminal and type/paste in that command. On Linux, I assume you know how to open your shell ;) It's normal to need to fill in the country code, city, company name (or your name), NA for organizational unit (unless you have an organizational unit), and your email address. The common name is the domain/sub-domain you are getting the certificate for. You do not need the optional challenge password or optional company name.
I like to copy the two output files myserver.key and server.csr somewhere safe right now, so I don't accidentally clobber them, especially if it's going to take a while for my certificate to be approved (like for an extended verification certificate.)
Step 3: Upload your generated CSR file, the server.csr file, to your certificate vendor. On macOS, an easy way to copy the contents of the file to the clipboard for pasting is:
cat server.csr | pbcopy
After submitting your CSR file, you may need to do some verification (to prove you are the owner of the domain you're securing) with your certificate provider. For a simple certificate, you usually can verify your ownership via email (to admin@your-domain or similar), via DNS (by setting a text entry in your DNS provider), or by uploading a file to your web server.
After you've finished jumping through some hoops, your certificate provider will send you your certificate, which is usually a zip file of various crt files. It may also be a crt file and a bundle file.
Step 4: Back in step 2, we created two files. We sent the server.csr file to our certificate provider to generate the certificate. The other file is our private key, that needs to be formatted for App Engine. We do this on the same computer we ran openssl on before:
openssl rsa -in myserver.key -out myserver.key.pem
We'll need myserver.key.pem to upload to GAE in a moment.
Step 5: Depending on what you got in your zip file from your certificate provider, you need to jam the files together into one file appropriately. You need to use cat to concatenate the files into one big file.
cat www_your_domain_com.crt secure_server.crt ca_file.crt higher_up_ca_file.crt > concat.crt
If you got a -bundle file, it will look like this:
cat www_your_domain_com.crt www_your_domain_com.ca-bundle > concat.crt
(I'm tempted to name the result file jammed.crt, but I don't to confuse things if you're following along on Google's instructions too!)
Step 6: Now we have two files myserver.key.pem and concat.crt that we need. Before we upload them, let's verify that we did everything right. We want the resulting hashes that come out of these two commands to match:
openssl rsa -noout -modulus -in myserver.key.pem | openssl md5
openssl x509 -noout -modulus -in concat.crt | openssl md5
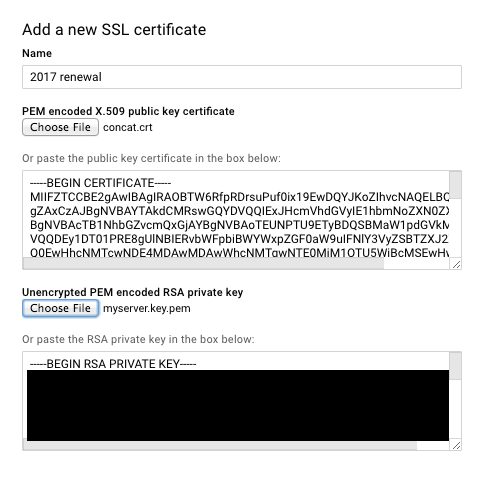
Step 7: In your web browser, sign into the Google App Engine console and go into the Settings section under App Engine and click SSL Certificates. Or, at the time of this writing, the link https://console.cloud.google.com/appengine/settings/certificates will take you right there. Click the "Upload a new certificate" button.
For the PEM encoded X.509 public key certificate, upload your file concat.crt.
For the Unencrypted PEM encoded RSA private key, upload your file myserver.key.pem.
Click the "Upload" button at the bottom of the screen.
(If you get an error that you need to prove you own the domain you're securing, make sure you've logged into the Google App Engine Console with the account that verified your domain before. Especially if you originally had set up your domain through Google Apps back in the day.)
Step 8: Select the domain you want to use the certificate for on the next screen, click submit, and you should be all set!
Step 9: Be patient a few minutes if you try to test your certificate in a browser. In my experience, it takes a little while to be served. If you're still not seeing your certificate after 20 minutes, then it's time to worry!
Bonus round! You may need to look at the certificate details in Chrome, which may make you wonder where the heck the certificate information is in Chrome. Click the little hamburger/three vertical dot menu in the upper right corner > More Tools > Developer Tools. In the window that pops up, go to the Security Tab, and then click View Certificate.
Go buy yourself a coffee (or your treat beverage of choice), because you deserve it.